Bonus Preserves and Pickling Tip Sheet
The first item on your canning list should be a good quality preserving pot with an non-reactive heavy bottom. 8 or 12 quarts should do it. The new stainless steel pots with thick aluminum disk bottoms are perfect. A large canning pot for sterilizing and processing jars is a must and should accommodate the Starfrit Canning Rack.
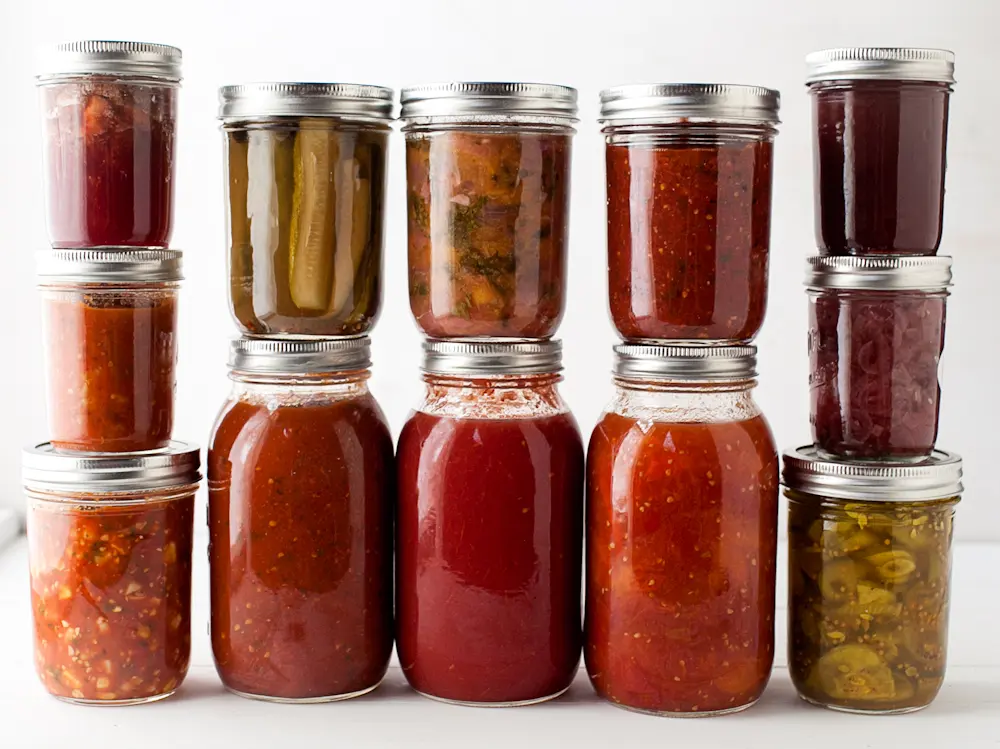
Look for brand name jars - Ball, Kerr and Bernardin. Dollar store canning jars are not as sanctioned for canning as these leading brands.
Jars come in many sizes. Smaller jars with narrow mouths are used for jams and jellies, while larger jars (pint and quart size) are recommended for pickled products or packing larger, whole items.
The rubber-trimmed lids must be replaced for each new canning session so stock up.
When it comes to produce, buy the best. Spoiled, over-ripe or under-ripe fruit will not set properly since it contains less pectin. In the case of small imperfections (when you're buying in large quantities) just trim off any small scars or blemishes. For jams and jellies, choose some fruit which is barely ripe (20% to 30%). This will help the jelling process. For pickling cucumbers, for example look for firm, fresh cukes without blemishes.
Proper sterilizing and processing of jars will ensure a quality product. Start by washing all equipment and jars (even new ones) in hot soapy water or in the dishwasher. Then, using a large canning pot, boil the jars for about ten minutes and then keep them simmering until required. All other parts (lids and metal rings) should be well scalded with boiling water before using - keep them simmering until needed. Once jars are filled, wipe the rim with a paper towel to dry and remove any jam drips. Just before sealing, insert a sterile knife in the filled jar to release any trapped air bubbles. This will allow the lids to form a proper seal. Gently screw on the metal rings and process jars in a boiling bath.
A great trick for sterilizing jars is to put newly washed jars on a large baking sheet. Place them in a preheated 225 F oven and give them 20 minutes to sterilize. Keep them warm as you are preparing preserves.
Some canners skip the boiling bath step but I recommend it. Not all bacteria are eliminated in the preliminary sterilizing. Place the sealed jars on a rack inside a large pot and cover them with water to 2 inches above their tops. Boil for 15 to 20 minutes. Properly sealed lids create a vacuum. Sometimes the lids will make a snapping sound as they seal down. Test a lid by pressing gently. If it flexes, the seal is not present.
Pectin and acid, natural substances found in fruit, promote jelling and shelf life. Sugar is the third component in the equation. Well balanced preserve recipes call for appropriate amounts of acid, pectin and sugar. If you wish to develop your own recipes, check a reference book for the acid content of the fruit(s) you wish to use. For example, combining a low acid fruit (strawberries) with a high acid fruit (oranges) provides a unique flavor and the proper acid to pectin ratio. Our recipes do not call for the use of commercial pectin. Jams made the traditional way, are easy to prepare and they bring forth the flavor of the fruit with the most basic of ingredients.
Knowing when your jam is ready is something that comes with experience, but there are two tests you may use. First, place a ceramic saucer in the freezer just before you begin your jam making. When you suspect the jam should be done, place a spoonful of the mixture on the cold saucer. It should begin to jell or thicken slightly when it's done. As well, rely on a jam and jelly thermometer as an indication of doneness. A reading between "Jelly" and "Soft Ball" (230°F) suggests it's done.
Most jams and preserves will look loose when they’re still very hot. As they cool, jams will thicken. Resist overcooking. Preserving is a way to capture summer in a jar. Take the time to do it right and you will be richly rewarded.
Five basic steps:
- Prepare jars and canning tools (washing and sterilizing).
- Prepare fruit (washing, trimming, cutting) and measure other ingredients.
- Cook fruit to tested done stage.
- Remove any air bubbles in jar with a sterile knife and seal.
- Process in boiling water bath appropriate time. Place jars in a cool, dark place for storage.
- Use a non-stick cooking spray for cooking pot interior sides and bottom, ladle and jar funnel. This makes for easy clean-up and sticky jam and preserves slide off ladle and funnel.
- Make lots of small batches. By making only a few pounds of one type of fruit, you end up with many more varieties. Too much of one thing is draining and you wear out before the other crops come in.
- If the weather is too hot to cook, prepare your fruit and place it in the preserving pot, along with other ingredients (sugar, lemon juice, etc.). Place the pot in the freezer and when the weather is cooler, (September to October) you can simply let the frozen pot of fruit warm slowly over low heat, then proceed with regular recipe directions.
- If jam burns while cooking, be careful not to stir the burned section into the unscathed part of the jam (and lower heat at the same time). Chances are, if you are careful, you'll not taste any burned preserves in the completed batch. For stubborn, burned-on jam, stuck to the bottom of a preserving pot, fill the pot with water (about half full) and place on a medium hot burner. Allow to simmer and jam will gradually release without too much scrubbing.